How I beat the online game 1to50 with neural network
Introduction
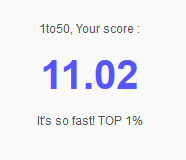
Well, it all started when some of my friends started playing this online game called 1to50, and they challenged me to beat their score. So the rule is quite simple, start clicking the blocks with numbers, in an incremental order, as fast as you can. Seems quite easy, right!? It did to me too, but my friends were scoring pretty good in it (try it, and if you consider 30–35 secs good). And I had to beat that, and if you may, in style :)
Intuition
For a bot to win this game, it should be able to determine the position of the individual numbers on the screen and simulate click events on those positions in incremental order. So I divided the problem into,
- Machine Leaning Part — Here we want our bot to identify the numbers. Or in a more generic way, an image classification engine. There are a mammoth of algorithms out there which were specially designed for this purpose which range from SVM, HOG features, PCA to nets. In the end it all boils down to personal preference, to me that’s neural network.
- Developmental Part — Here we want to handle all the interaction with the environment. The environment being the website which contains the game board (numbers blocks). We want to take care of the screenshots to mouse drags to mouse click events. Python has a variety of packages for this, more on this later.
Training neural network to identify digits
This is arguably the most discussed example for image classification problem. Ask any neural network enthusiast, and he/she will recommend you to use convolutional neural network for images. And most of them will suggest using MNIST database as they contain large numbers of numeric digits examples. But it has a few problems of its own,
- It contains digits only up to 9, but as you might have guessed from the game’s name, we want to train for 50 digits. Collecting those extra examples for training is going to be a huge pain.
- As it turns out, CNN tends to outperform simple vanilla NN for image classification using MNIST database because of their additional pooling and convolution features. But the question is, can we solve our problem (of beating this game) without taking that one step of complexity. Well, we can if we cheat, just a little!
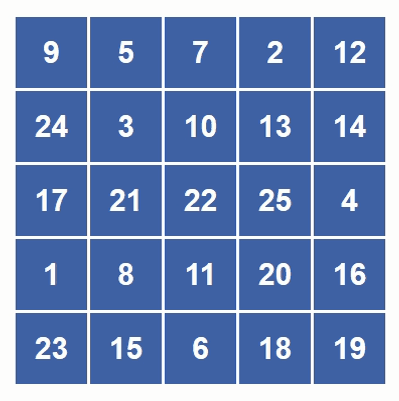
So if you look closely at the game board, it is kinda same every time, right! So will be the numbers inside, every time. We don’t need to collect thousands of digits example and train on them, if we are only going to get same digit images. So how should we exploit this knowledge? Simple separate all these numbers, make copies of them and train the network on them. And that’s exactly what I did! And the best part, it works with a simple 1 hidden layer vanilla neural network.
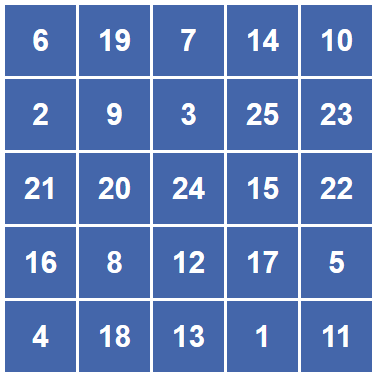


To separate number boxes from the game board, I used Greenshot to take screenshots of the game board, and wrote a script to separate out the individual numbers from the board by finding the contours and defining bounding rectangles. Repeated this for 26 to 50 number range and I have 50 images of digits 1 to 50, each of 71 by 71 pixel size. Now comes the interesting part!
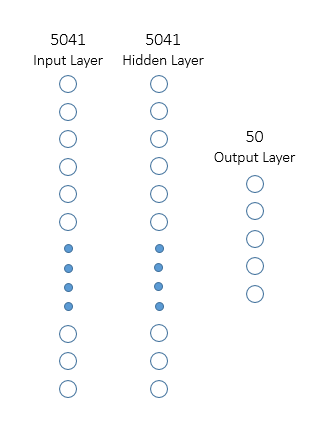
Our final goal here is to have a neural network, which takes each of these images as input and correctly classifies them as output, so lets define our input layer of 71x71=5041 nodes and output of 50 nodes length. Lets throw in a hidden layer of same size as input layer. So our final neural network looks something like this,
The neural network is quite easy to implement using Keras in python, here we go,
# create model
model = Sequential()
# add input and hidden layer
model.add(Dense(hidden_layer_len, input_dim=input_layer_len, kernel_initializer='normal', activation='relu'))
# add output layer
model.add(Dense(output_layer_len, kernel_initializer='normal', activation='softmax'))
# set loss function and optimizer
model.compile(loss='categorical_crossentropy', optimizer='adam', metrics=['accuracy'])
We are nearly done here. All we need to do is load the images, make copies of them, I made 400 copies of each, so its 400x50 = 20,000 sample images for training, use same for testing for the sake of it, set the epochs and batch size (sometimes playing with them can vary the training results) and hope for once, that our network overfits on the data. And it did :)
Train on 20000 samples, validate on 20000 samples
Epoch 1/5
 - 118s - loss: 3.5002 - acc: 0.9235 - val_loss: 2.8315 - val_acc: 1.0000
Epoch 2/5
 - 115s - loss: 2.0896 - acc: 1.0000 - val_loss: 1.3648 - val_acc: 1.0000
Epoch 3/5
 - 115s - loss: 0.9297 - acc: 1.0000 - val_loss: 0.5552 - val_acc: 1.0000
Epoch 4/5
 - 118s - loss: 0.3612 - acc: 1.0000 - val_loss: 0.2086 - val_acc: 1.0000
Epoch 5/5
 - 113s - loss: 0.1435 - acc: 1.0000 - val_loss: 0.0942 - val_acc: 1.0000
Error: 0.00%
Playing the game — (How it was not supposed to be played)
Done with the machine learning part, let move into the developmental part. So here are some of the things we want to do,
- Automate the mouse click event — as it turns out, python have an awesome package pyautoguiwhich makes clicking as easy as a simple function call.
- Automate the screenshot process — using 3rd party application for training purpose was justified, but not if we want our bot to run from start to end with minimum human intervention. For this I used python packages mss which can grab a section of the screen if you just provide it with some screen co-ordinates.
So let’s define the solution steps,
- Open the game website,
- Get the left-corner co-ordinates of the game board along with the height and width,
- Provide it to the *mss *package to grab that section of the screen,
- Pass the screenshot to the script which separates the numbers from the game board, store the location of the numbers,
- Pass each number to the trained neural network and get the label as the output, create a (label , location) pair of all identified numbers,
- Sort the identified numbers by label, and pass the co-ordinates to pyautogui *to simulate mouse drag and click events, one by one.*
- Once you reach 25, repeat from step 3 once more. And there you have it.
Closing Notes
Well there a lot of things I would have done differently, like implementing the convolution network, or using the MNIST dataset or even doing a simple image lookup instead of implementing the vanilla neural networks. But that wouldn’t have been this much fun, at least not for me. If someone is able to come up with another approach, do share your experience. Till then, adios.
*Get all the code discussed in the post here.