Voice Activity Detection
Introduction
- 🗣 Voice activity detection (VAD) is the process of identifying the chunks or parts of an audio stream that contains certain "voiced activities".
- There could be different types of activity detection modules depending on the type of voice we want to identify. It could be human voice (in a conversation) or animal voice (in forest) or something else entirely!

Steps in VAD
- The complete VAD process can be broken down to two simple steps,
Step 1:we start with dividing the audio into multiple chunks of small sizes. Usually these chunks are quite small like10ms,20msor30ms.Step 2:we have a classifier or detector, that takes the chunk as input and predicts if the chunk has voice or not. The classifier could be a simple logic based algorithm or even neural network models. It depends on the acceptable tradeoff between accuracy and speed.
Code
Py-WebRTC VAD
- For practice, we will use Py-WebRTC VAD package that is a port to the WebRTC project by Google. It provides sufficiently good accuracy with lightening speed! ⚡️ The complete code is shown below,
1 2 3 4 5 6 7 8 9 10 11 12 13 14 15 16 17 18 19 20 21 22 23 24 25 26 27 28 29 30 31 32 33 34 35 36 37 38 39 40 41 42 43 44 45 46 47 | |
- Let's go through the code,
Line 3-5: we import the required packages. Make sure to install them usingpipbefore starting. In case you are facing some issue, please install the specificed python and package versions (mentioned in the code).Line 7- 18: we read a sample wav file (use your own ) and then transform the bit depth of the audio into
 int16. One point to note here is thatwebrtcvadonly works forsample rate = 16000andbit depth = int16. Andlibrosaloads an audio file in float. Because of all this requirement we need to perform the transformations.Line 21: we transform the numpy array (format in which an audio file is loaded inlibrosa) to byte string. This will be required for chunking and VAD analysis.Line 24-27: we initialize an instance ofwebrtcvadwith aggressiveness parameter. Note, the range is form 0 to 3, and higher the value, the more strict VAD is in classification chunks as voice. This means, you can miss some relevant voice chunks for higher aggressiveness and on the other hand get some false positives with lower aggressiveness.-
Line 31-45: the code to first create chunks of the audio and then perform VAD classification atline 37-38. The final results is stored insegmentsvariable and a sample output is shown below,start stop is_speech 0 480 True 480 960 True 960 1440 False 1440 1920 False 1920 2400 False Here, each row denotes one chunk. The
startandstopcolumns contain the begin and end details of each chunk. Finally theis_speechcolumn containsTrueorFalsevalue depedening on if the chunk was detected as voice chunk or not.
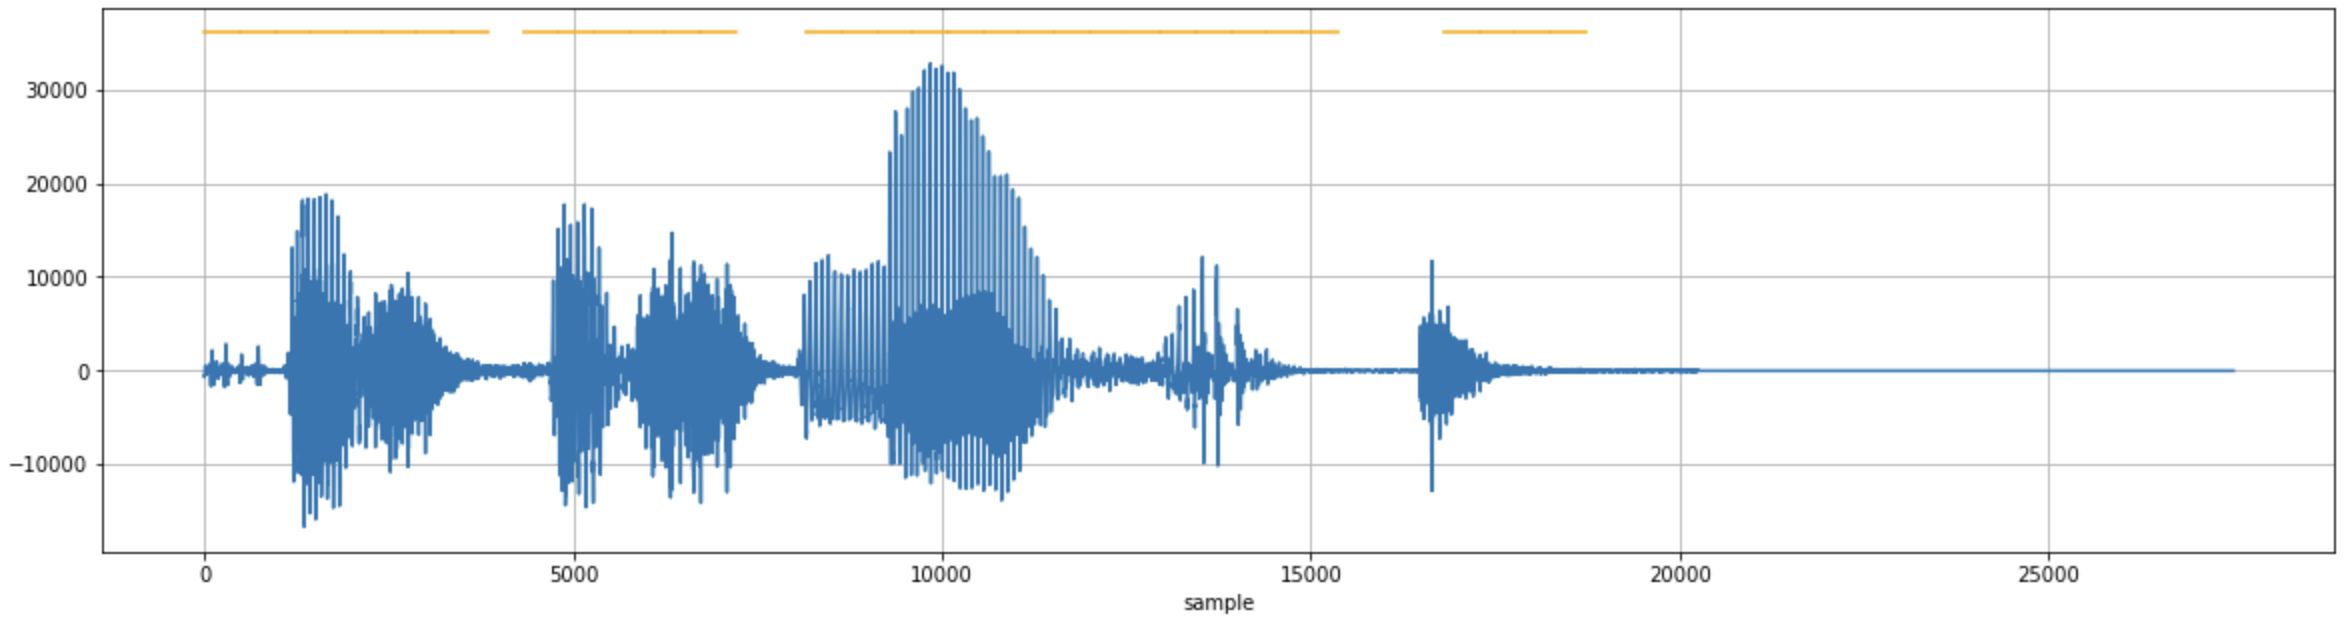
- Here is the code's output visualized in form of waveform with vice chunks highlighted.

webrtcvad detected voice chunks highlighted with yellow line on top. The aggressiveness parameter value was 0, hence lot's of false positive (chunks with no voice) are detected as well.
Silero-VAD
Hint
Personal experience - Silerio-VAD is much more efficient and accurate than Py-WebRTC VAD. It is highly recommended even for production systems.
- Silero-VAD is another voice activity detection model that stands out for its stellar accuracy and speed. The model can process an audio chunk of over 30 milliseconds in less than 1 millisecond on a single CPU thread. This performance can be further enhanced through batching or GPU usage, with ONNX potentially offering a 4-5 times speed increase under certain conditions. Additionally, Silero VAD's lightweight nature is evident in its JIT model, which is approximately one megabyte in size, making it highly efficient and easy to integrate into various applications.
- Beyond its technical prowess, Silero VAD is notable for its general applicability and flexibility. It was trained on a vast corpus covering over 100 languages, enabling it to perform effectively across a range of audio types, from different domains to various background noise and quality levels. The model supports 8000 Hz and 16000 Hz sampling rates, accommodating different audio quality requirements. Furthermore, while it was trained on 30 ms chunks, it can handle longer chunks directly, and possibly even shorter ones. Its high portability is another advantage, benefiting from the robust ecosystems of PyTorch and ONNX, and it can run wherever these frameworks are available. Finally, Silero VAD is published under the permissive MIT license. Now, let's try it out (Refer)
1 2 3 4 5 6 7 8 9 10 11 12 13 14 15 16 17 18 19 20 21 22 23 24 25 26 27 28 29 | |
Warning
For consistent results, use model.reset_states() after every audio chunk. Refer here for more details.